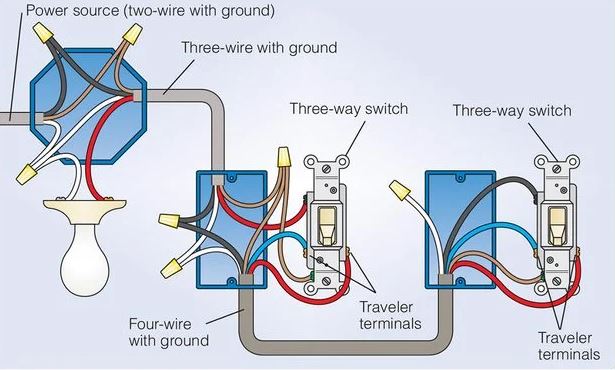
In this article: We will cover the steps involved in wiring a three way switch using NM cable:
Three-way switches can be found in most homes and are used to control a single fixture from two different locations. This type of switch is commonly used for lights, but it can also be used to control other electrical devices like fans or outlets.
Materials Needed:
- Three-way switch
- NM cable (14/3 or 12/3)
- Wire stripper
- Needle-nose pliers
- Screwdriver (flat-head and Phillips)
- Non-contact voltage tester
Step 1: Turn off the power
Before starting any electrical work, it is essential to turn off the power at the circuit breaker or fuse box. You can test the circuit to ensure that there is no electricity running through the wires using a non-contact voltage tester. This device can detect the presence of electricity without actually touching the wires. Once you have turned off the power and confirmed that the circuit is dead, you can proceed with the installation of the switch.
Step 2: Install the first switch
The first step in installing a three-way switch is to install the first switch. This switch is usually located at one end of the circuit, and it controls the power to the fixture. Start by removing the cover plate from the switch and unscrewing the switch from the electrical box. You should see three wires coming out of the wall: a black “hot” wire, a white neutral wire, and a red traveler wire. The hot wire is the one that carries the electricity to the switch, and the neutral wire is connected to the switch to complete the circuit. The traveler wire is the one that connects the two switches and allows you to control the fixture from two different locations.
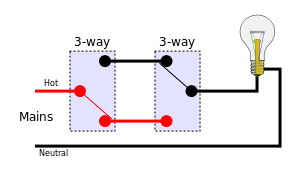
3 Way Wiring Diagram:

Next, you need to connect the black and white wires to the appropriate terminals on the switch. The black wire should be connected to the dark-colored screw, and the white wire should be connected to the light-colored screw. The remaining terminal on the switch should be connected to the red traveler wire.
Step 3: Run NM cable between switches
The next step is to run NM cable between the two switches. NM cable is a type of electrical cable that consists of two or more insulated wires wrapped in a protective sheath. You will need either 14/3 or 12/3 NM cable, depending on the size of your circuit. Secure the cable to the wall or ceiling with staples or wire clips as necessary. Once you have run the cable between the two switches, you need to strip the outer jacket from the cable and strip the ends of the wires.
Step 4: Install the second switch
Now it is time to install the second switch. This switch is usually located at the other end of the circuit, and it also controls the power to the fixture. Remove the cover plate from the switch and unscrew the switch from the electrical box. Connect the black and white wires from the NM cable to the appropriate terminals on the switch. Connect the red traveler wire to the remaining terminal.
Step 5: Connect the switches
The next step is to connect the two switches. Connect the traveler wire from the first switch to the traveler terminal on the second switch. The neutral wires from both switches should be connected together with a wire nut. Finally, connect the “hot” wires together with a wire nut and pigtail (a short piece of wire) that will connect to the remaining terminal on each switch.

Step 6: Test the circuit
Once you have connected all the wires, it is time to turn the power back on and test the circuit. Flip the switches to ensure that the fixture turns on and off from both locations. If everything is working correctly, you have successfully wired a three-way switch using NM cable.
(Video) How To
Wiring a three-way switch using NM cable may seem complicated, but it is a simple process that can be accomplished with some basic knowledge and tools. It is important to always turn off the power and test the circuit to ensure safety. Installing a three-way switch allows you to control a fixture or device from two different locations, making it a convenient feature in any home.
it is worth noting that there are different types of three-way switches that can be used in wiring. The most common types are the standard three-way switch and the dimmer switch. Dimmer switches are popular for lighting fixtures because they allow you to adjust the brightness of the lights. When using a dimmer switch, it is important to make sure that it is compatible with the type of light bulb you are using.
PDFs / Technicals
3 Way Switch Wiring (PDF)
Home Repair: 3 Way Switches (PDF)
Additionally, it is important to use the right gauge of wire for your circuit. The most common wire gauges for residential electrical work are 14 and 12. The gauge of wire you need depends on the amperage of the circuit. A 15-amp circuit requires 14-gauge wire, while a 20-amp circuit requires 12-gauge wire.
In conclusion, wiring a three-way switch using NM cable is a simple process that can be accomplished with some basic knowledge and tools. It is important to always follow safety guidelines and use the appropriate wire gauge for your circuit. By understanding the steps involved in wiring a three-way switch, you can add this convenient feature to your home and control your fixtures or devices from multiple locations.
FAQ
Which wire goes where on a 3-way switch?
There are several wires involved in wiring a 3-way switch, including the black or red “traveler” wires, the white neutral wire, and the green or bare ground wire. On a standard 3-way switch, the black or red traveler wires are connected to the two brass-colored screw terminals on the switch, while the white neutral wire is connected to the silver-colored screw terminal. The green or bare ground wire is connected to the green screw terminal or to the grounding wire in the electrical box.
What happens if a 3-way switch is wired wrong?
If a 3-way switch is wired incorrectly, it can cause the switch to not function properly or it can cause a short circuit, which can be dangerous. Some common issues that can occur include the lights not turning on, the lights turning on but not turning off, or the lights flickering. It is important to double-check all connections and follow proper wiring procedures to ensure the switch is wired correctly.
Is the red wire common in a 3-way switch?
Yes, the red wire is commonly used as a traveler wire in 3-way switch wiring. However, it is important to note that the exact wiring configuration may vary depending on the switch and circuit setup.
How do you identify a line and load on a 3-way switch?
To identify the line and load on a 3-way switch, you can use a voltage tester to test each wire in the switch box. The line is the wire that supplies power to the switch, while the load is the wire that runs to the fixture or device being controlled by the switch. Once you have identified these wires, you can connect them to the appropriate screw terminals on the switch.
How do you wire a Leviton 3-way switch?
Wiring a Leviton 3-way switch is similar to wiring a standard 3-way switch. The black or red traveler wires are connected to the brass-colored screw terminals, the white neutral wire is connected to the silver-colored screw terminal, and the green or bare ground wire is connected to the green screw terminal. However, it is important to refer to the specific wiring instructions for your particular switch model to ensure proper installation.
What is a California 3-way?
A California 3-way, also known as a “coast 3-way” or “back-wired 3-way,” is a type of 3-way switch wiring that is commonly used in California and other parts of the United States. This type of wiring is different from the standard 3-way wiring method and is typically used to comply with certain electrical codes and regulations.
Useful Resources
Wiring a 4 Way Switch: Step by Step Guide
Ceiling Fans: Wiring and Installation
Common Capacitor Types and Their Functions
Centrifugal Switch: What They Do, How They Work and When To Use Them
Basic Electrical Knowledge