Materials And Tools For Installing Ceiling Fan
Materials
- Electrical Tape
- Junction Box
- Ceiling Fan
- Ceiling Plate
Tools
- Power Drill
- Drill Bits
- Wrench
- Ladder
How To Install A Ceiling Fan
- Choose A Location For The Ceiling Fan
Place the ceiling fan in the center of the room, or as close to the center as possible. Mark the position of the joists with a pencil or painter’s tape. The ceiling fan should be centered and installed between two joists. Mark the center point with a pencil.
- Cut A Hole In The Ceiling
Shut off power to all circuits that may pass through the ceiling. Attach a 4-inch hole saw to the drill bit. Cut a hole in the center of the mark from the previous step.
- Pass The Cable Through The Hole
Depending on the model of your ceiling fan, you may need to use a 14 gauge or 12 gauge NM wire. You can also consult your fan user manual. Hold the cord against the coil while pushing the free end into the hole.
- Wire Through The Ceiling
Run the wire through the hole in the ceiling to the wall where the light switch is. Route the cable down and through one of the open holes in the control box.
- Cut The Wires At The Panel Or Box
Cut the cable at the control box leaving 6 to 8 inches of cable hanging from the front of the control box. Run a second wire from the control box to an electrical panel or another permanent power source nearby. At the end of the switch, feed the wire through one of the holes in the box, leaving 6 to 8 inches to hang. Leave about 2 feet at the end of the service panel so you can work with them in the next steps.
- Connecting Cables To The Switch
Disconnect all wires in the light switch box. Strip back the wire coating by 1/2 inch.
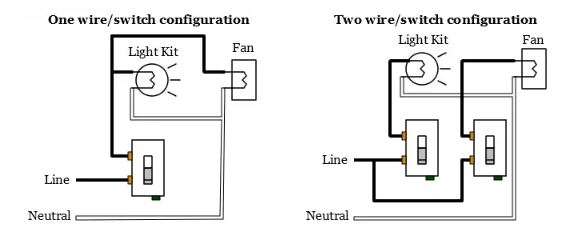
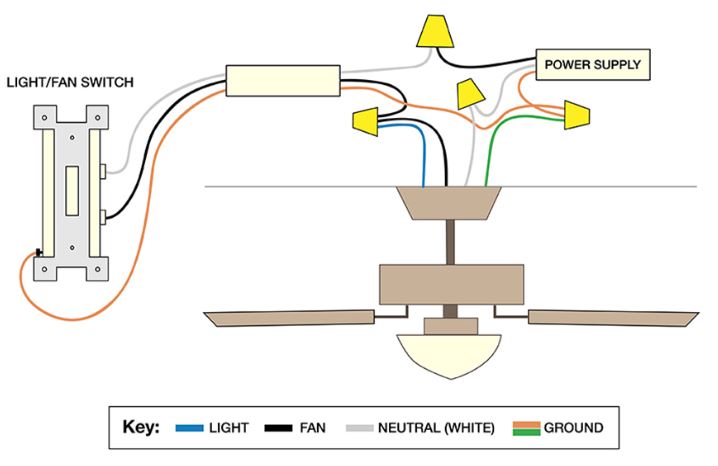
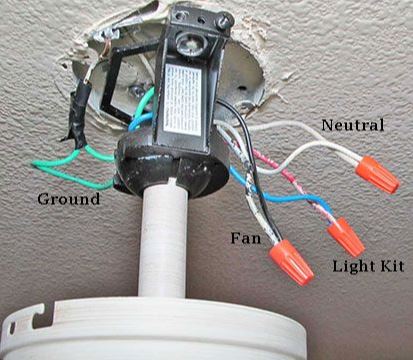
Wiring Examples

Wire Fittings by Color
Note: Before performing any electrical work – Power to the circuit should always be shut off and tested to confirm

- Black
Connect the black wire coming from the ceiling fan to the gold terminal wire on the light switch.
- White
Secure the two white wires with the cable nuts, past the light switch.
- Ground
Attach the two bare ground wires by twisting them together
Mounting The Fan

- Attach The Ceiling Fan Brace To The Joist
Remove every piece of insulation from the hole. Disconnect the electrical box from the brace. Insert the brace through the hole. Center the brace over the hole. It should be perpendicular to the joists.
With the brace feet resting against the ceiling drywall, turn the brace by hand until it fits snugly between the joists. Do one or two final turns with a wrench to make it tightly fixed. Finish with the flat side of the brace facing down.
- Route The Cable To The Fan’s Electrical Box
Smash one of the lugs on the side of the ceiling fan’s metal case. Then attach it with the cable clamp. Thread the cable through the clamp and remove the sheathing, leaving only 1/2 to 1/4 inch of the jacket in the box. Rewind the cable end by 1/2 inch. Then tighten the clamps afterward.
- Attach The Ceiling Fan Box To The Brace
Now that everything is done, you can now attach the ceiling fan box to the retrofit brace.
PDFs / Technicals
Useful Resources
Common Capacitor Types and Their Functions
Centrifugal Switch: What They Do, How They Work and When To Use Them
Choose The Right Motor Starter – Types and How They Work
Dimmer Switches: Wiring, Diagrams and Installation Suggestions